三步完成在英特尔独立显卡上量化和部署ChatGLM3-6B模型
 openlab_4276841a
更新于 2年前
openlab_4276841a
更新于 2年前
作者: 英特尔边缘计算创新大使 刘力;
1.1 ChatGLM3-6B简介
ChatGLM3 是智谱AI和清华大学 KEG 实验室联合发布的新一代对话预训练模型。ChatGLM3-6B 是 ChatGLM3 系列中的开源模型,在填写问卷进行登记后亦允许免费商业使用。
引用自:https://github.com/THUDM/ChatGLM3
请使用命令,将ChatGLM3-6B模型下载到本地(例如,保存到D盘):
git clone https://www.modelscope.cn/ZhipuAI/chatglm3-6b.git
1.2 BigDL-LLM简介
BigDL-LLM是开源,遵循Apache 2.0许可证,专门用于在英特尔的硬件平台上加速大语言模型(Large Language Model, LLM)推理计算的软件工具包。它是在原有的BigDL框架基础上,为了应对大语言模型在推理过程中对性能和资源的高要求而设计的。BigDL-LLM旨在通过优化和硬件加速技术来提高大语言模型的运行效率,减少推理延迟,并降低资源消耗。
GitHub:https://github.com/intel-****ytics/BigDL
本文将详细介绍基于BigDL-LLM在英特尔独立显卡上量化和部署ChatGLM3-6B模型。
1.3 部署平台简介
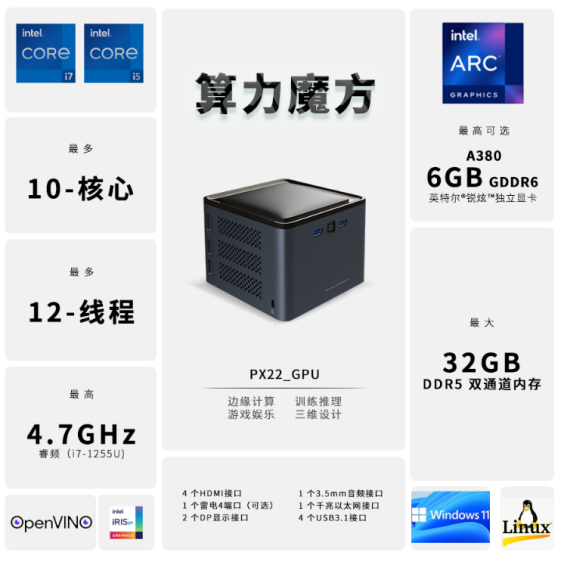
算力魔方是一款可以DIY的迷你主机,采用了抽屉式设计,后续组装、升级、维护只需要拔插模块。
通过选择计算模块的版本,再搭配不同额 IO 模块可以组成丰富的配置,适应不同场景。性能不够时,可以升级计算模块提升算力, IO 接口不匹配时,可以更换 IO 模块调整功能,而无需重构整个系统。本文在带有A380独立显卡的算力魔方上完成验证。
1.4 在英特尔独立显卡上部署ChatGLM3-6B
1.4.1 搭建开发环境
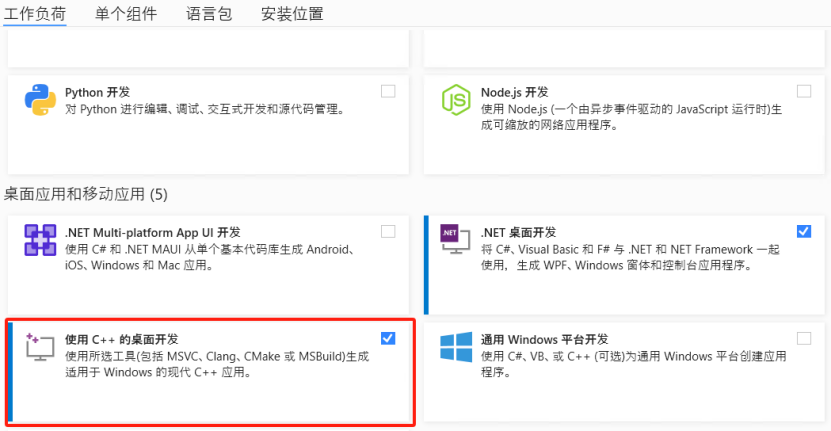
第一步:请下载并安装Visual Studio 2022 Community Edition。安装时务必选择“使用C++的桌面开发”。注意:不要修改默认安装路径!
下载链接:https://visualstudio.microsoft.com/zh-hans/downloads/
第二步:请下载并安装英特尔独立显卡驱动程序。下载链接:https://www.intel.cn/content/www/cn/zh/download/785597/intel-arc-iris-xe-graphics-windows.html。
第三步:请下载并安装Intel® oneAPI Base Toolkit。下载链接:https://www.intel.com/content/www/us/en/developer/tools/oneapi/base-toolkit-download.html。
第四步:请下载并安装Anaconda,然后用下面的命令创建名为“bigdl”的虚拟环境。
conda create -n bigdl python=3.9 libuv

conda activate bigdl
1.4.2 第二步,安装BigDL-LLM[xpu]
第一步:用下载器(例如:迅雷)下载*.whl安装包到本地。下载链接:
https://intel-extension-for-pytorch.s3.amazonaws.com/ipex_stable/xpu/torch-2.1.0a0%2Bcxx11.abi-cp39-cp39-win_amd64.whl
https://intel-extension-for-pytorch.s3.amazonaws.com/ipex_stable/xpu/torchvision-0.16.0a0%2Bcxx11.abi-cp39-cp39-win_amd64.whl
https://intel-extension-for-pytorch.s3.amazonaws.com/ipex_stable/xpu/intel_extension_for_pytorch-2.1.10%2Bxpu-cp39-cp39-win_amd64.whl
第二步:执行命令:
# 从本地安装已下载的.whl安装包
pip install torch-2.1.0a0+cxx11.abi-cp39-cp39-win_amd64.whl
pip install torchvision-0.16.0a0+cxx11.abi-cp39-cp39-win_amd64.whl
pip install intel_extension_for_pytorch-2.1.10+xpu-cp39-cp39-win_amd64.whl
# 安装支持英特尔显卡的bigdl-llm
pip install --pre --upgrade bigdl-llm[xpu] -i https://mirrors.aliyun.com/pypi/simple/
详情参考:https://bigdl.readthedocs.io/en/latest/doc/LLM/Overview/install_gpu.html
1.4.3 第三步:运行范例程序
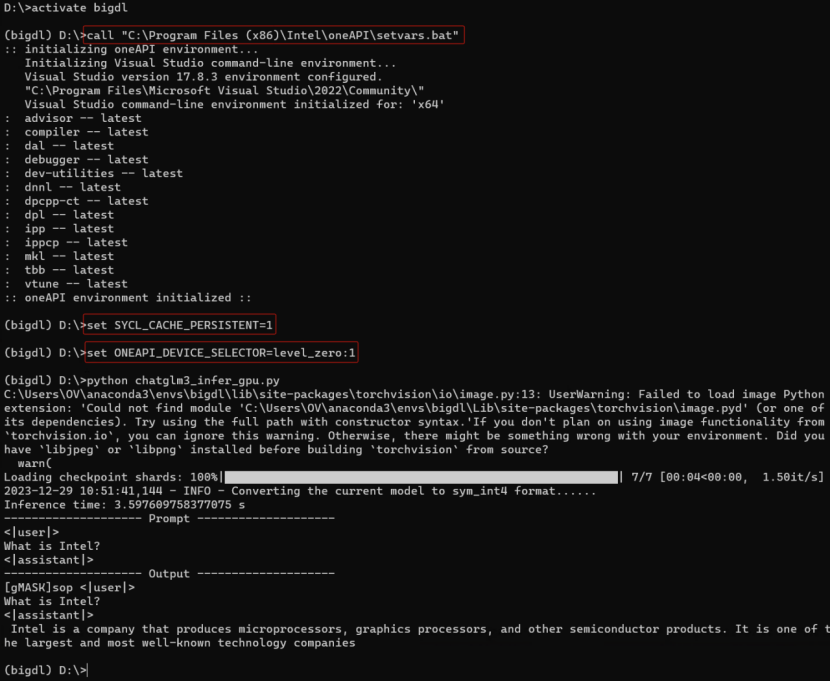
首先:执行命令,配置环境变量:
conda activate bigdl

call "C:\Program Files (x86)\Intel\oneAPI\setvar***at"

set SYCL_CACHE_PERSISTENT=1

set BIGDL_LLM_XMX_DISABLED=1
若系统中有集成显卡,请执行下面的命令,保证英特尔独立显卡是“xpu”指代的计算设备,详情参考:https://github.com/intel-****ytics/BigDL/issues/9768
set ONEAPI_DEVICE_SELECTOR=level_zero:1 然后,请下载范例程序并运行:https://gitee.com/Pauntech/chat-glm3/blob/master/chatglm3_infer_gpu.py
import time

from bigdl.llm.transformers import AutoModel

from transformers import AutoTokenizer

import intel_extension_for_pytorch as ipex

import torch

CHATGLM_V3_PROMPT_FORMAT = "<|user|>\n{prompt}\n<|assistant|>"

# 请指定chatglm3-6b的本地路径

model_path = "d:/chatglm3-6b"

# 载入ChatGLM3-6B模型并实现INT4量化

model = AutoModel.from_pretrained(model_path,

                                  load_in_4bit=True,

                                  trust_remote_code=True)

# run the optimized model on Intel GPU

model = model.to('xpu')

# 载入tokenizer

tokenizer = AutoTokenizer.from_pretrained(model_path,

                                          trust_remote_code=True)

# 制作ChatGLM3格式提示词

prompt = CHATGLM_V3_PROMPT_FORMAT.format(prompt="What is Intel?")

# 对提示词编码

input_ids = tokenizer.encode(prompt, return_tensors="pt")

input_ids = input_ids.to('xpu')

st = time.time()

# 执行推理计算,生成Tokens

output = model.generate(input_id***ax_new_tokens=32)

end = time.time()

# 对生成Tokens解码并显示

output_str = tokenizer.decode(output[0], skip_special_tokens=True)

print(f'Inference time: {end-st} s')

print('-'*20, 'Prompt', '-'*20)

print(prompt)

print('-'*20, 'Output', '-'*20)

print(output_str)
运行结果,如下所示:
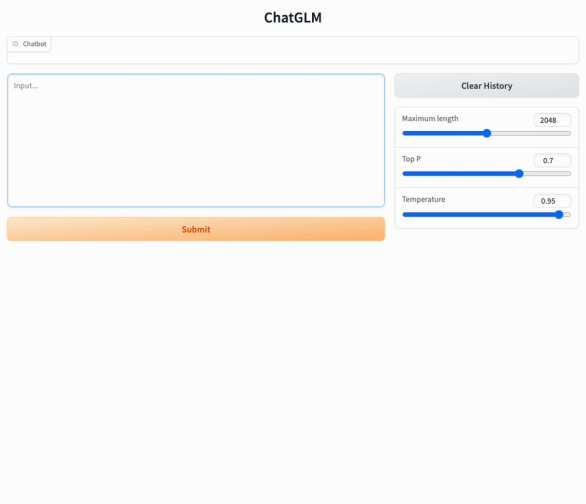
1.4.4 运行ChatGLM3-6B WebUI demo
首先,请先安装依赖软件包:
pip install gradio mdtex2html streamlit -i https://mirrors.aliyun.com/pypi/simple/ 然后,运行命令,配置环境变量:
conda activate bigdl

call "C:\Program Files (x86)\Intel\oneAPI\setvar***at"

set SYCL_CACHE_PERSISTENT=1

set BIGDL_LLM_XMX_DISABLED=1
若系统中有集成显卡,请执行下面的命令,保证英特尔独立显卡是“xpu”指代的计算设备,详情参考:https://github.com/intel-****ytics/BigDL/issues/9768
set ONEAPI_DEVICE_SELECTOR=level_zero:1 最后,请下载范例程序:https://gitee.com/Pauntech/chat-glm3/blob/master/chatglm3_web_demo_gpu.py
并运行:
streamlit run chatglm3_web_demo_gpu.py 运行结果如下:

插入视频(视频链接:链接:https://pan.baidu.com/s/1Mm9XB0mtph7qGCRYmtl6vA?pwd=bk6b 提取码:bk6b )
1.5 总结
BigDL-LLM工具包简单易用,仅需三步即可完成开发环境搭建、bigdl-llm[xpu]安装以及ChatGLM3-6B模型的INT4量化以及在英特尔独立显卡上的部署。
作者介绍:
刘力,深圳市铂盛科技有限公司的创始人。带领团队成功设计了多种计算机系统,并申请了多项专利和软件著作,铂盛科技为国家高新技术企业,深圳市专精特新企业。铂盛通过整合算力和算法,打造软硬件一体化的AIPC解决方案,目前产品已在工业控制、智能机器人、教育、医疗、金融等多个边缘计算领域得到广泛应用。
联系方式
电话:13537819699
Email:leo.liu@pasuntech.com